Showing posts with label maintenance. Show all posts

Tuesday, May 24, 2011

MiG-21 Work Continues

MiG consultants for the Cold War Air Museum  are in town working on our MiG-21UM and MiG-23UB.

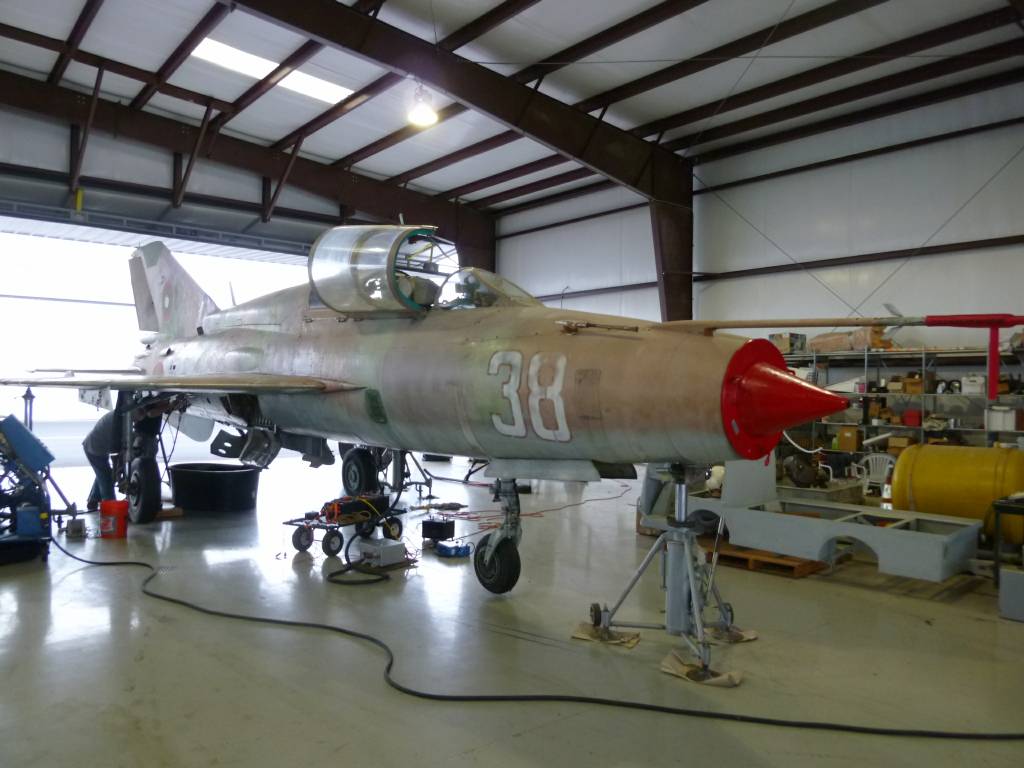
On jacks, Bord 38 is about to go through gear retraction and extension cycles. Our external "mule" allows the hydraulic system to be isolated and checked before we move on to testing the engine. Ground tests are an important milestone in the restoration and certification process.


Improvisation is sometimes necessary. A few litres of hydraulic fluid needed to be injected into a hydraulic reservoir through this service port, so we modified a bug sprayer from the local hardware store to do the job. Kazik shows us how it's done.


Meanwhile, Roman inspects the connections and cannon plugs under the MiG-21's wheel well.


Our goal for this month is to get the hydraulic systems on the MiG-21 tested and the engine started so the aircraft can be taxied under its own power.

Sunday, May 22, 2011

Aircraft Registration Marks

Part of the process of getting an aircraft at the Cold War Air Museum ready for certification is complying with the external marking requirements of the Federal Aviation Administration (FAA).

FAR 45.22 provides a few things that are unique to Experimental Exhibition aircraft:

1) "N numbers" can be as little as 2 inches tall and;

2) Instead of the word "EXPERIMENTAL" on the outside of the aircraft, an X can be placed in the second digit of the "N number" to identify the aircraft in the experimental category.

These concessions allow an aircraft to be displayed close to its original military markings, without as many visual distractions. After going through this ordeal with his own plane, one of the museum benefactors bought a stencil machine to help us with this process and Jon has provided some pictures and a description from one of the current projects, below.

First, the stencil must be designed using the vinyl cutting program. Stencil material can be up to 15 inches wide and the image can either be "positive" (blocking paint from the surface), or "negative" (the stencil is painted over and then removed, leaving a painted image behind).


Here, a "negative" is applied to the aircraft.


Then masking is added to limit over-spray on the rest of the aircraft and the floor.


And paint is applied.


Finally, the stencil is removed. Some experience is helpful at this step, as the paint must be dry enough to leave clean edges but not so dry that it pulls up with the stencil.


The result is a very nice "N number" of precisely the desired size and style.

Watch for more updates on this aircraft in the near future!

Wednesday, April 27, 2011

Cold War Air Museum - Labels

Projects at the Cold War Air Museum often involve a number of people and many details.

Placing N numbers and labels on an aircraft is one of the many details necessary to complete each project.

Changing critical labeling in the aircraft to English makes the aircraft safer and more convenient to operate. Many of the English label sets were still available from the original Polish factory. Others had to be made.

With some of the original non-critical labeling still in place, there is an interesting mix that adds to the feel and authenticity of the aircraft.

The aircraft lighting system is equipped with both red and white lights for variable lighting conditions and night ops.

Rheostat adjustments allow lighting levels to be increased or decreased. The overall effect at night is dramatic and suitable for fine low budget movie special effects.

Sunday, April 10, 2011

MiG-23 Progress

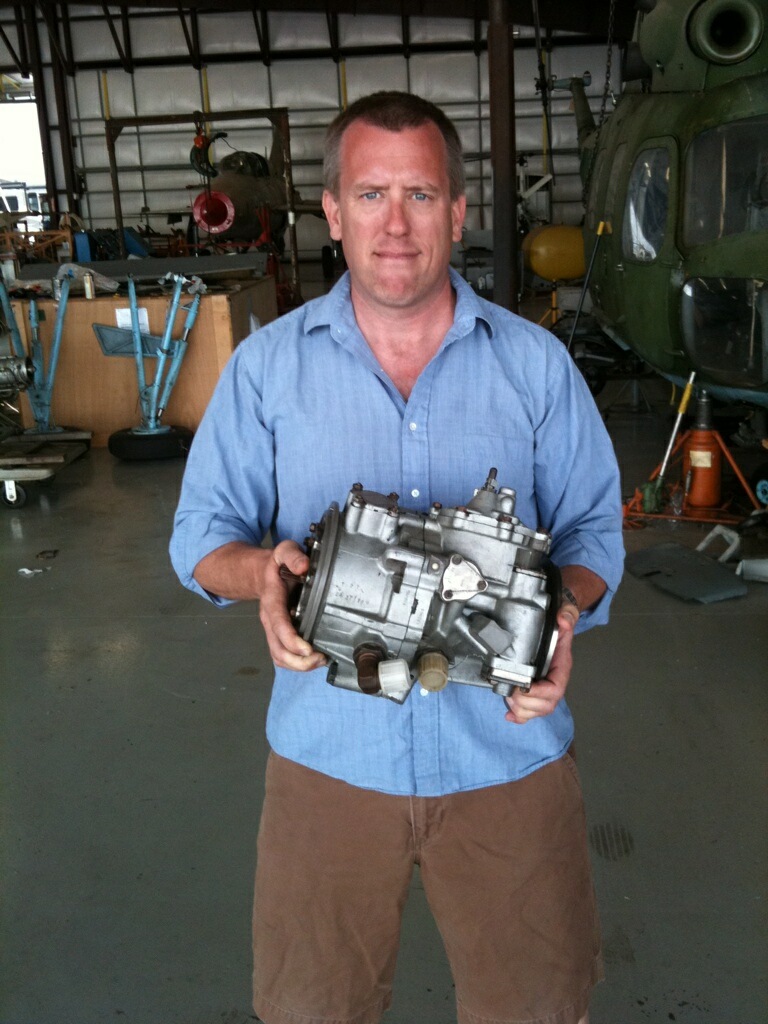
One of the more interesting components of the MiG-23 is the PGL-30M Hydraulic Powered Speed Regulator, a device that uses fuel to feed a vaned drive which in turn powers the AC generator.

Rather than using a complicated gear reduction mechanism to drive the AC generator from the engine rotation, the designers at MiG decided to use fuel pressure through a fluid labyrinth to obtain the constant RPM needed by the AC generator.

This works beautifully, producing a constant (plus or minus 2%) RPM... except when the PGL-30M leaks. Of course, when it leaks, it leaks fuel, which is the case with the Cold War Air Museum's MiG-23.

The MiG-23 doesn't do anything in a small way when it comes to fuel. Until the device was removed it was necessary to put a 150 gallon plastic stock tank under the aircraft to catch the drip.

Here Jon holds the leaking PGL-30M, the grimace on his face evidence of the fact that the device is even heavier than it looks.

The museum has located a replacement regulator, which we expect to be arriving in the near future.

Sunday, February 27, 2011

L29 Delfin Smiles

Some of the recent work at the Cold War Air Museum has focused on bringing one of the museum's L-29 projects up to flying status.

The group working on Bord 41 pauses in front of the aircraft to smile about how the work is progressing.

The sound of jet engines is a happy sound to the volunteers and to the airport fuel concession.

A total of four L29's were brought out, started, taxied or flown (several at the airport are already licensed and flying) over the weekend.

Following one of these engine and taxi tests, the photographer got the chance to get (almost) everyone in front of Bord 41 for the lead picture above.

Work will continue on the aircraft until it's successful airworthiness inspection, scheduled for the near future.

Sunday, February 20, 2011

L29 Delfin Soon to Fly

With so many projects ongoing at the Cold War Air Museum, some inevitably get delayed longer than others. The assembly of this L-29 actually started several years ago, but was put on hold when a fuel leak was discovered. Knowing that the aircraft would have to be disassembled to find the leak, the project was set aside until time and manpower became available.

This weekend, we were fortunate to bring the resources together that were needed. After demating the nose section and removing the front fuel tank, the leak was found.

The leak was not visible through any of the various inspection openings. While it was hoped that it might simply be from a hose, connector or seal that could easily be tightened or replaced, replacement front and rear fuel tanks were readied, just in case.

As it turned out, one of the tanks was indeed the culprit. Water, the natural enemy of aircraft, had accumulated in the bottom of the front tank and over the years, corrosion had taken it's toll.

As always, when an aircraft is opened up, a thorough inspection and cleaning took place.

With no other damage found, the front compartment was made ready to accept the replacement tank.

The new tank is carefully guided into place. The front tank has channels on each side where air ducts feed the engine from the wing roots. The rear tank has a "doughnut hole" in the center where the air passes through to feed the engine intake.

With the tank installed, the nose is remated to the center section. Having the necessary equipment makes the job easier. While the nose was supported and moved on a wheeled nose dolly, the center section was supported by jacks as the tail rested on a tail dolly. Each piece is a standard piece of L29 ground support equipment.

In addition to the numerous cables, controls, pneumatic and hydraulic connections, the nose section is structurally attached to the center section by a ring of (many) bolts reached through the rear cockpit and lower fuselage. Here Mike is shown working up a magic combination of extensions to get to the bolts.

The best man for the job did not have much room to work in. Unfortunately it seems like aircraft designers often expect techs to be impossibly small and limber, with extra long arms and at least six fingers on each hand to wiggle things into places they can't see.

While the aircraft was up on jacks, it was also a good opportunity to replace tires and check the brakes.

Brad makes quick work of the job, this bird is now ready to stop and go. The main tires on the L29 are the same as the main tires on the Mi-2, so one stock of consumables provides for both.

While the old tires showed normal wear for the aircraft, one of the tubes was creased. The new tubes were installed with care (and talcum powder) to ensure that the new tube could expand evenly when it is first inflated.

This picture is not what it looks like. Larry is NOT about to grease Zach's face. Instead, Zach is simply monitoring as Larry applies grease to some of the many fittings found throughout the gear system.

With lots of coffee needed to fuel the workers, the L29's IFF compartment became an impromptu table. With both the fixed wing and helicopter group working on the project to meet a tight schedule, a great deal was accomplished in a short time. This project looks like it is going to be a resounding success, with everyone looking forward to taking a ride in Bord 41 soon.

Saturday, February 12, 2011

MiG Manuals

One of the goals of the Cold War Air Museum is the restoration of Eastern Block aircraft.

We are fortunate that the Soviets distributed their maintenance manuals all over the world along with their equipment. The Soviet designers also helped our cause tremendously by using (in general), proven and robust designs. Many of the parts in each of these aircraft are often found in other aircraft as well.

This is a sample from some of the multiple cases of manuals that various associates have purchased from around the world. Location diagrams like these help generate a mental picture of the inside of the aircraft, where parts are located and how they connect together.

Identifiers on the equipment diagrams help direct technicians to specific sections as necessary.

We are glad that the Soviets relied on "old fashioned" paper products for this material. No computer or microfiche reader necessary and the technical language is straightforward to translate.

Saturday, April 24, 2010

Mi-24 Altimeter News, moving from 6 o'clock to 7 o'clock position

As part of the U.S. certification process for the Cold War Air Museum Mil Mi-24, the altimeter needed to be changed from meters to feet. While airspeed indicators can be remarked, altimeters have to be replaced because the equivalent gear ratio between the "big hand" and "little hand" is different for "English" (1 turn for every 1000 feet) and "Metric" (1 turn for every 3,281 feet) units.

The panel cutout for all of the altimeters in our Soviet helicopters has a teardrop shape, the barometric adjustment knob is at the "6 o'clock" position. It is located directly at the bottom of the instrument.

While many older U.S. Altimeters had an adjustment in this position, they are now non-standard and are much harder to find. While we recently purchased several rebuilt units for the helicopters, when one was installed in Bord 118, we found it already needed to be overhauled again. Essentially it had failed while "on the shelf". This caused us to look instead at modifying our panels to use the more readily available, more modern parts that have an adjustment knob at the "7 o'clock" position (drawn on the picture above).

Again, we are fortunate to have the resources to use our metal craftsman, Charles, who has done this kind of work before. In order to keep metal shavings or dust from getting into the instruments or switch panels, the area around and behind the panel was protected with plastic sheets or paper filler to catch the bits of metal being removed.

An altimeter with the "new" style adjustment is shown here temporarily mounted in the reworked panel. The old opening remaining below the altimeter will be covered with a filler plate.

Sunday, April 11, 2010

MiG-23 Dorsal Repair

When the Cold War Air Museum MiG-23 was shipped to Texas,

it came partially disassembled in an open top container.

A portion of the structure on top of the aircraft obviously encountered something along the way. Fortunately, the extent of the damage was very small compared to the mishap that destroyed one of our Mi-24's.

As work has progressed on the MiG, the damaged ribs and damaged portion of the turtledeck skin were removed.

Replacement ribs were fabricated and a replacement piece of skin was flush joined to the remaining structure.

The final join will be a perfect fit. We are fortunate to have a craftsman with the ability to do the necessary work.

Sunday, March 28, 2010

MiGs and Mils, Cockpit Color

A topic of discussion for visitors at the Cold War Air Museum has been; "What color is that?" Or; "Why did the Soviets paint their cockpits green?"
Model making web sites have frequent questions and discussions about getting the exact color of soviet aircraft cockpits, exactly right.

Fortunately, we have the advantage of having the "real thing" with which to compare. We have been told that the color chosen by Soviet designers helps to reduce stress and maintain a pilot's effectiveness on long missions. While the Soviets were not the only country (or manufacturer) to use this color, they have used it for so long and in such great numbers that it has become a trademark of Sov-block aircraft.

Because not all aircraft are painted at the same time, or at the same place, there is some inevitable variation in color. Some aircraft have more of a green tone.

And, some have more of a blue tone, even when the aircraft come out of the same factory in the same country. In general though, the description "blue-green" seems to fit slightly more of the aircraft we see (especially the newer ones), than the alternate description often given as "light green".

These three panels, or sections of panels from different aircraft, show some color variation even though all three came from the same factory.

We don't worry too much about making an exact color match to some mythical factory standard, but we do make a color match for individual aircraft when necessary during restoration. Besides, we are mostly guys, and most of us simply made it through kindergarten with the 8-count box of crayolas, not the 64 count box (I don't even know how they come up with the names for so many colors). While the paint store most closely matched the blue-green above with a commercial color named "Mermaid Green", it's just not right to say "Our fighter cockpits are decorated in Mermaid Green". So for now, we'll just stick with something that fits within our limited repertoire and continue to refer to all of these colors as simply blue-green, or more simply as just that "Russian Cockpit Color".

Monday, February 15, 2010

MiG-23 Tire Change

Following the taxi test of the MiG-23 at the Cold War Air Museum during Soviet Big-Iron Saturday, we began noticing that the port tire was losing pressure. We had anticipated replacing the tires that came with Bord 022 and fortunately, our replacement set was already on hand.

A particularly handy thing is to keep a spare tire already mounted on a spare rim to minimize the time needed to "rescue" an aircraft in case a tire should "blow", or go flat during operations. One of our "spares" was already mounted on a rim, simplifying this replacement process.

However, this did not eliminate the need to read the instructions. The MiG-23 wheel assembly consists of approximately 60 individual components, not including nuts and washers (so much for Soviet Simplicity, this time anyway). Here Jon is seen trying to figure out what does and, more importantly, does not need to be taken apart in order to replace the wheel.

The massive disk brake mechanism incorporates an anti-skid system and uses six big rotors and seven heavy-duty stators in each wheel.

The amount of heat that can be generated by the brakes poses a serious bursting issue with the tires. To prevent this, the designers at MiG incorporated two interesting features. The first is an electric fan. Mounted in the center of the axle, the fan activates when the "weight on wheels" switch signals that the aircraft is once again on the ground.

Shown with the axle fan is the nut that holds the wheel on. A keeper ring goes between the fan mounting bolts and the axle to keep the fan and the nut from turning as the tire turns. In the picture below, Jon is inspecting the electrical connection for the fan motor in the center axle.

The second feature is a solder plug that melts at 140°C, allowing pressure to escape before the tire can burst. On fast landings or after any extensive brake use, MiG-23 pilots may alert their ground crews so the wheels can be doused with water so the plug doesn't melt.

Sliding the tire on over the six rows of rotors is a little like working a combination lock, but with a little light on the subject and some patience, Jon and Sean were able to get the tire on fairly easily.

All that remains is re-mounting the mud guard, applying safety wire and cotter pins to various keepers, and... of course... next, the replacment of the starboard tire.